Photo by frank mckenna on Unsplash
Introduction To Docker
Containers that can run reliably in any environment
“It works on mine, so it works everywhere.” ~ Ranindu Abeyratne ~
What is Docker & why should I use it?
Docker is a set of the platform as a service (PaaS) products that use OS-level virtualization to deliver software in packages called containers.
Yea, but what does that mean?
Well, docker solves an age-old problem where you would hear one person say “the code doesn’t work!”, and the other would reply with “...well it works on my computer”.
What docker does is that it would use a set of instructions defined in what’s known as a Dockerfile, to run your application on a specified operating system (OS). Unlike a regular VM, Docker only virtualizes the OS and uses the available hardware, which makes everything run faster! This can then be used in any local machine of your choice. There are 3 fundamental elements that enable Docker:
- Dockerfile
- Image
- Container
What are Docker Images & Containers?
The first thing you will do after you have written a Dockerfile for your application is build the image using a docker build command. Once the image is built, you could use that image to create your container. Running the image multiple times will create multiple clones of a container.
A container is what holds your application. Think of this as a virtual computer. A container will run its own OS and run your application inside it. Therefore anyone using an image you built or a container that you created would have your application without facing any sort of OS-level restrictions or issues.

Docker Container Running On Different OS’s
Getting Started
By now you should have a rough idea of how Docker works. Now here’s how to put it into practice. First thing’s first, you will need a simple application to work with. I will go ahead and create a sample React application to “containerize” it.
Open up your terminal, and cd (change directory) into a directory/folder where you would want to create your application. Then to get started you would want to run:
npx create-react-app my_react_app
Congratulations, you now have a basic react app to work with.
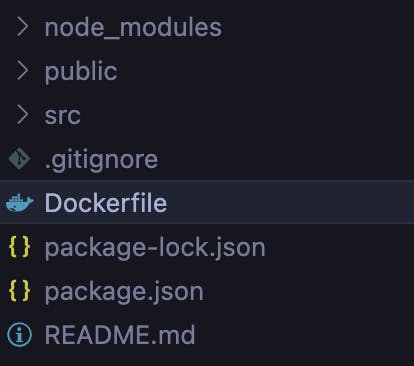
Next, open the application you installed with your favorite text editor and create a “Dockerfile”.
Your directory structure should now look something like this.

The Dockerfile
Now that you have your Dockerfile created, we can look into what it does. The Dockerfile gives a specific set of instructions for what goes into your container. You can specify things such as OS version, and how to build and run your application. Here’s a simple Dockefile.
FROM node:16

# Default directory for your app
WORKDIR /usr/src/app

# Install app dependencies
# A wildcard is used to ensure both package.json AND package-lock.json are copied
# where available (npm@5+)
COPY package*.json ./

RUN npm install
# If you are building your code for production
# RUN npm ci --only=production

# Bundle app source
COPY . .

EXPOSE 8080
CMD [ "npm", "run", "start" ]
The commands you want Docker to execute during build time are written in all caps for readability purposes.
FROM - This defines what type of OS you want the container to have. A list of all the official images can be found here. In this example, we want to have an image with Node.Js already in it as we’re working with a react application.
WORKDIR - This is your default directory, you can specify a path you want here and it will create the needed directories. From this point onwards docker will treat this as its home location. Therefore, unless explicitly defined, anything you copy or add will go into this location.
COPY - This command takes 2 arguments. The first one is what to copy from your LOCAL device, and the second argument is where to paste it inside your container. So when you define
COPY package*.json ./
COPY . .
this means that you want the build to copy both your package.json and your package-lock.json into your home location which is defined using WORKDIR. The wildcard (* icon) means that you want both package.json and package-lock.json to be copied. The second COPY . . means copy all of the content from your local device (the directory where your Dockerfile is located) into your container WORKDIR location.
RUN - This is used when you want to execute a terminal command inside the container. Since you already copied your package files, you can now ask docker to run npm install, and it will install all your dependencies that are found inside your package.json file. You can run a command like mkdir if you wanted to create a new directory for some reason.
EXPOSE - This tells Docker to get all of the required information during the runtime from a specified Port and exposes that port. Therefore communication cannot occur through any other port since those will all be closed.
CMD - Finally the CMD command is to let Docker know to start the application and end the build from there. You might be asking why not use RUN? When you use RUN and your application starts and says that it’s listening on PORT 8080, Docker will wait until it finishes listening to stop the build. This means it will never stop unless you manage to Ctrl+C the build, and that would result in a failed build.
The Build
Once the Dockerfile is in place. You can run the build command
docker build -t my-first-image:1.0.0 .
“docker build” defines what you want docker to do, which in this case would be to build your image. The “-t” means to tag the image so you can give it a name and a version number if you want. Finally, the “.” at the end of the command is to tell docker where your Dockerfile is located.
Once your image is done building you can now check out your latest creation using
docker images
which should show you something like this

Your first reaction should be “WTF?! Why is a simple react app 1.37Gb?”
Well, that’s because the initial image you defined in your Dockerfile is “FROM node:16”. This comes with a lot of unwanted packages and libraries, which can also lead to security issues. There are a few ways you can fix this. One, by using a lightweight distro like alpine, or you could use a multi-stage docker build. However, I will leave that topic for a different article.
After you’ve built the image you can now run it using
docker run -d 8f0
you ask docker to run it in “-d” detached mode. This is to avoid docker from showing you the logs and not being able to escape it without hitting Ctrl + C. You can copy paste the IMAGE ID, or you can just use the first 3 characters of the ID as long as it’s unique and not shared by another image ID.
Now that your container’s running, you will be able to hit localhost on your browser and look at what you’ve achieved so far. If you’ve exposed a different port other than 8080. You can try with localhost:.
Congratulations! You’ve taken your first step into the world of DevOps.
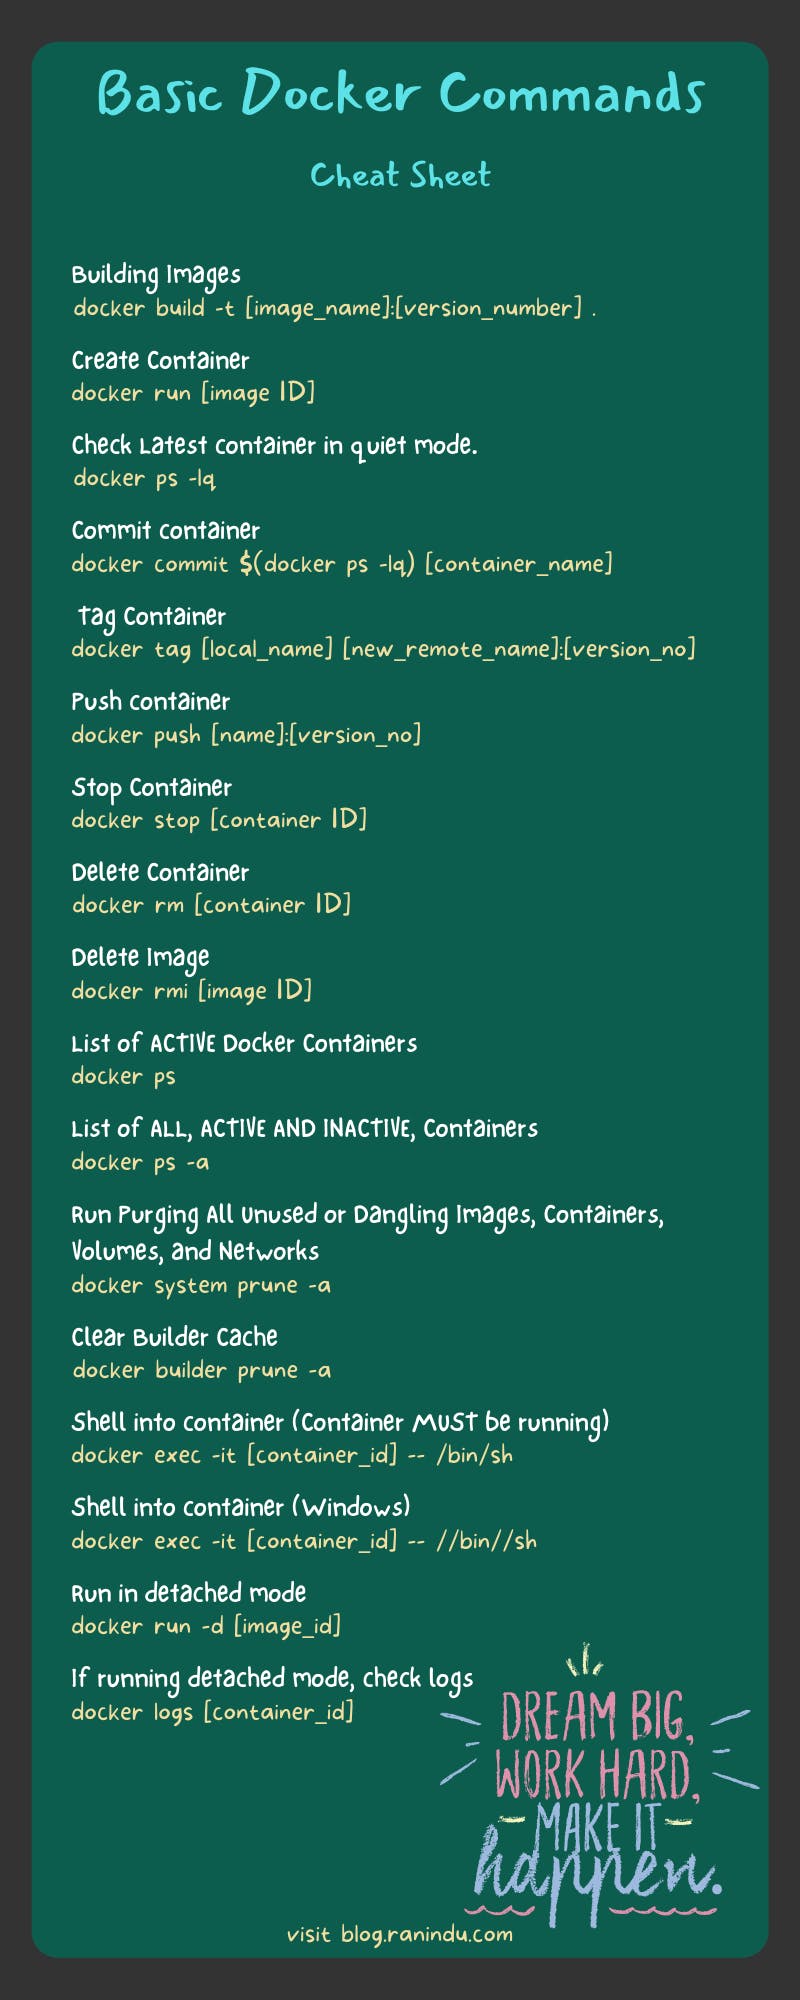
Cheatsheet
I thought it would be nice to leave you guys with a cheat sheet that I made to refer to when I had to work with containers a bit. Some of these commands appear in common use cases.


